(adapted from http://www.markallen.com/teaching/ucsd/147a/lectures/lecture3/1.php)
Contents
This page introduces many coupled electrical/mechanical systems.
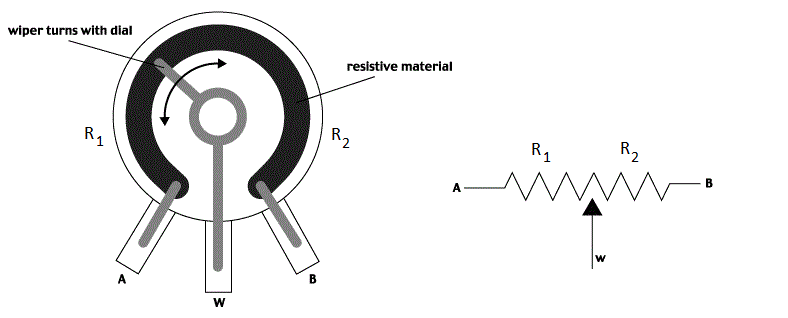
Perhaps the simplest coupled electromechanical system is the rotary potentiometer. The image below shows how a potentiometer works, followed by a photograph of an actual potentiometer.

(adapted from
http://www.markallen.com/teaching/ucsd/147a/lectures/lecture3/1.php)

(adapted from
http://www.openobject.org/physicalprogramming/Potentiometer)
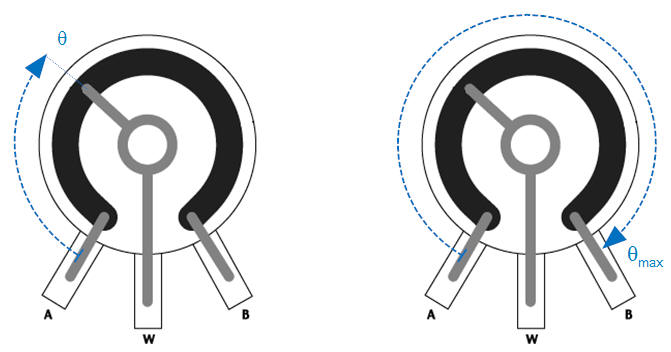
Typically an arc of resistive material is laid between the connection labeled "A" and "B," as shown. A conductive "wiper" lays upon the resistive material. This wiper can rotate about the center of the potentiometer while maintaining electrical contact with the terminal labeled "w." The resistance between the wiper and "A" is labeled R1, the resistance between the wiper and "B" is labeled R22. The total resistance between "A" and "B" is constant, R1+R2=Rtot. If the potentiometer is turned to the extreme counterclockwise position such that the wiper is touching "A" we will call this θ=0; in this position R1=0 and R2=Rtot. If the wiper is in the extreme clockwise position such that it is touching "B" we will call this θ=θmax; in this position R1=Rtot and R2=0.
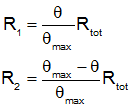
R1 and R2 vary linearly with θ between the two extremes:
To see one way in which a potentiometer can be used to sense angular position, consider the circuit below. The image at the left shows the potentiometer. The image on the right shows the equivalent circuit in terms of R1 and R2 (as defined in the previous paragraph).
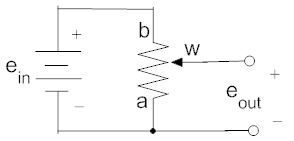
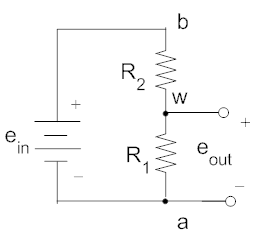
Using the voltage divider principle we can write:

We can now substitute the expression for R1 in terms of θ,

In this expression you can see that eout is directly proportional to θ, the rotation of the potentiometer.
Although the potentiometer discussed here encodes angular position, it is also possible to lay out the resistive material in a straight line and encode linear position; this is called, unsurprisingly, a linear potentiometer
A large class of electromechanical systems, including motors, generators, and speakers, depend on the coupling between currents in moving wires and electromagnetic fields. The topic is an extremely broad one, and we will consider only static magnetic fields and currents and motion that are perpendicular to those fields (so that the cross-products involved (see here) become simple multiplication).
Many of the electromechanical devices we will discuss rely on multiple loops of wire moving in a magnetic field. Before moving on to multiple loops, we will start with simple images involving only one loop. The wire has the following characteristics:
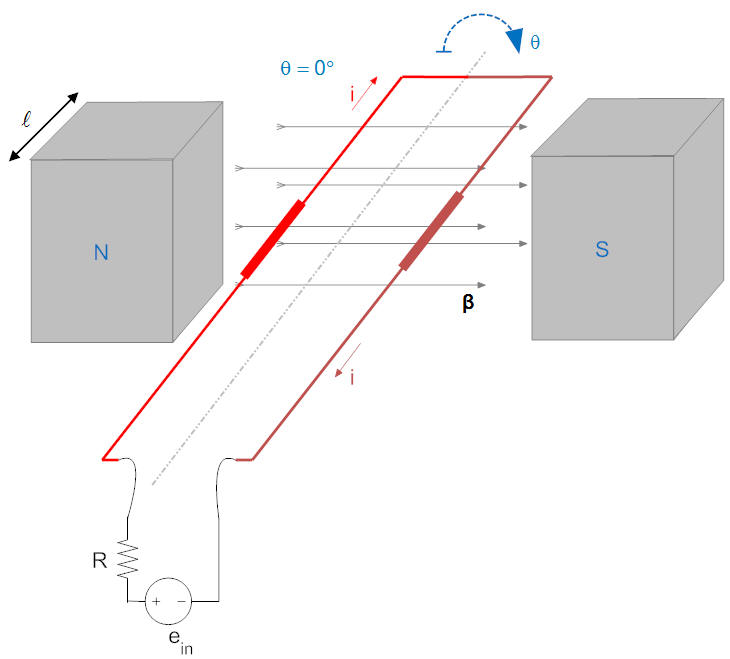
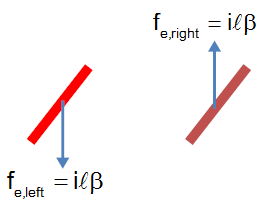
The induced force on the red section of the wire is downwards (current is into the page, and magnetic field is to the right, so the cross product is down). The force on the brown section is upwards.
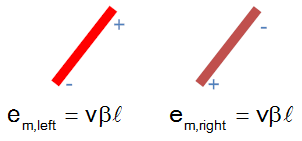
Likewise we find that the induced voltage on the red section has the positive side towards the back (positive velocity of the wire is upwards, and magnetic field is to the right). The induced voltage on the brown section has the negative side towards the back.
Since the force is perpendicular to the wire, the total torque on the wire about the midline is given by

(the factor of 2 is because each side of the wire contributes). Also there is an induced voltage (often called a "back emf") of

across the two ends of the loop (with the positive side to the right). It is more common to write this equation in terms of the rotational velocity using the relationship between linear velocity (v), roational velociy (ω) and radius (a), v=ωa.

We call the quantity α the "motor constant" or "torque constant." Note that it is the same constant in the equation for the torque, τe, as for the back emf, em.
The loop of wire described above is a kind of motor. If we apply a voltage, a torque on the loop results. However there is a problem with this. Imagine that the wire has rotated 180° (note that the red wire is now on the right).
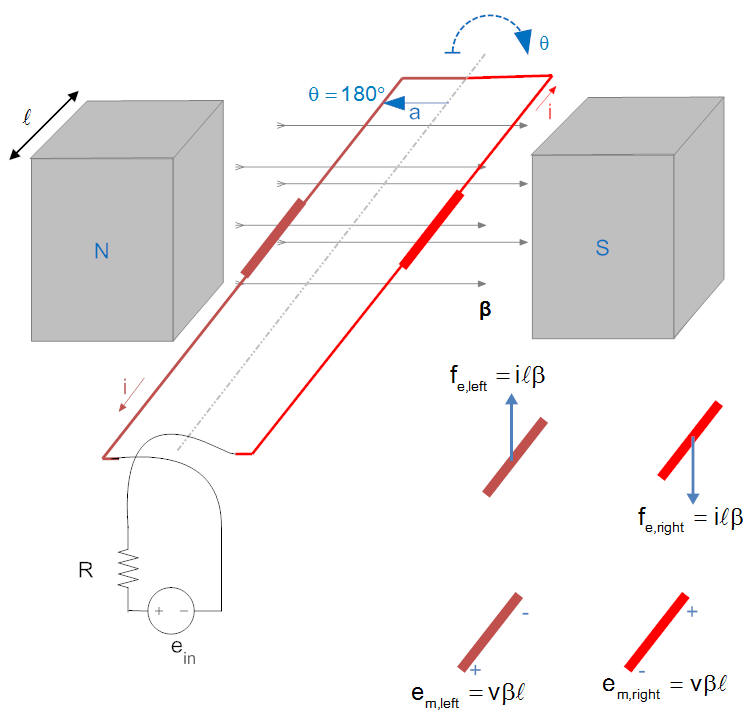
In this case the forces (and hence the torque) on the loop have reversed direction, so the device isn't a useful motor. However we can eliminate this problem by the use of electric "commutators" and "brushes" as shown below.
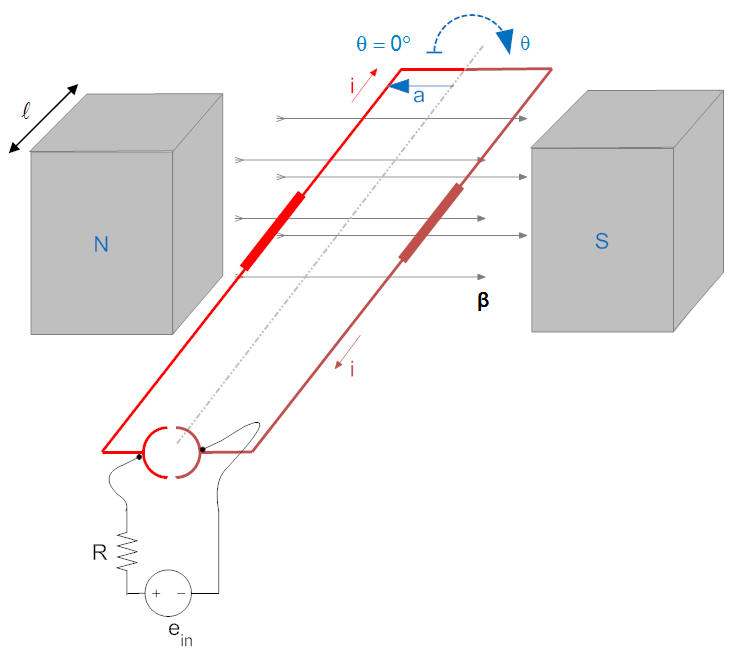
The ends of the wires are now attached to two semicircular pieces of metal called a commutator that rotate with the wire. Electrical connection is made to the the circuit through brushes (shown by small circles on the ends of the wire coming from the voltage source) that are stationary but are physically touching the commutator. As the wire turns electrical contact is maintained, as shown below:
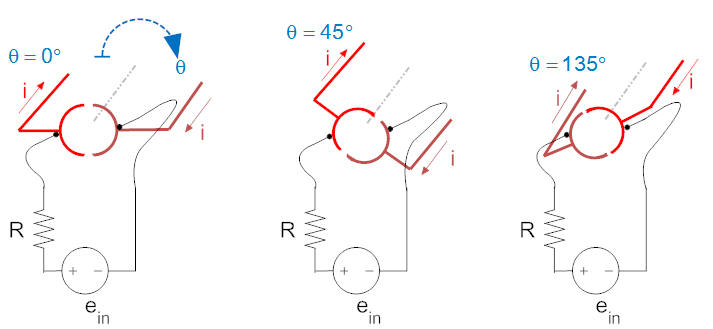
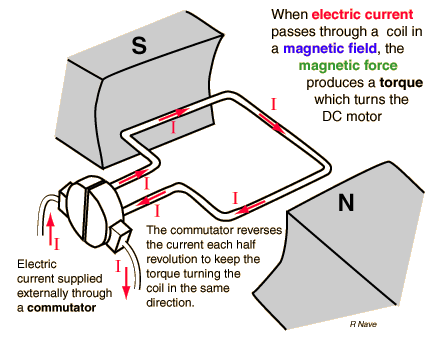
When the angle is less than 90°, the current flows from the source into the left half of the loop, i.e., red wire. As the commutator passes through 90° the positive side of the voltage source is now connected to the brown wire. This maintains the direction of the current in the left half of the loop, which is now the brown wire. This maintains an upward force on the left (brown) wire and downwards on the right (red) wire, resulting in a continued clockwise torque. A better image is below (from http://www.diylive.net/index.php/2006/10/17/dcac-motors-and-generators).
We can expand the discussion above to a more realistic model of a dc motor. Consider the cross section of a motor shown below that has several loops of wire.
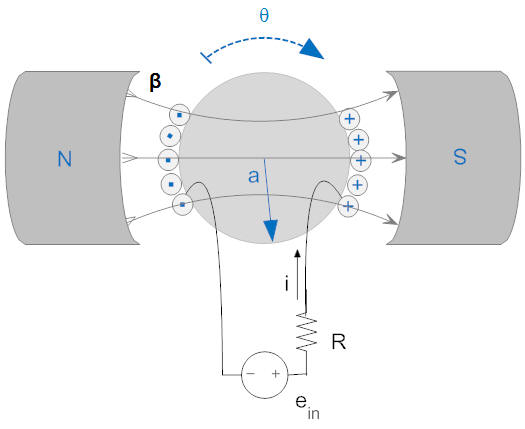
In this diagram:
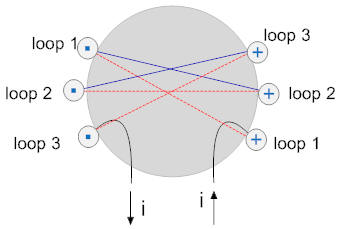
Note - practice there are multiple sets of windings (not a single set as in this case). The introductory page shows a motor with many sets of windings. As each passes by the brushes, the direction of its current changes. At this point, don't worry about how this would work physically, it is only the concept of current changing direction that matters.
We develop a mathematical model for this system as we did the single loop, but multiply the results by "n" because of the multiple loops. To analyze such systems we will always employ two diagrams, one for the mechanical system and one for the electrical system. Each of the systems will be coupled to the other by a term (typically a force or torque proportional to current for the mechanical system, and a back emf related to velocity for the electrical system).
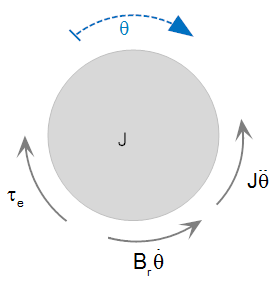
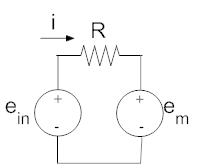
We first must find the direction of the induced torque and polarity of the induced voltage. We can do this by considering just one segment of wire from the right side of the rotor. Since the current in each of these segments is into the screen and the magnetic field is left to right, the right hand rule tells us that the induced force is downward, and the resulting torque is clockwise (see below). Likewise if θ is moving in a positive direction, then the velocity, v, of a wire on the right side is downward. Using the right hand rule tells us that the end of the wire towards us will have positive polarity. Since this is the section of the coil attached to the resistor, we get the schematic shown below.
| Mechanical Free Body Diagram | Electrical Schematic | |
 |
 |
We know from our previous analysis that the torque from one loop of wire is given by "2·a·i·ℓ·β," so the torque from "n" loops will be:

and the back emf will be

The motor takes as input an electrical source (in this case the voltage ein) and generates a mechanical output (in this case a torque, τe).
Derive the transfer function of a permanent magnet DC motor if the input is ein and the output is the angle, θ
Solution:
From the free body diagram we get

and from the schematic we get

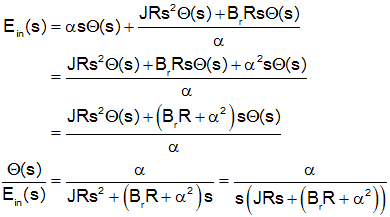
We want a solution in terms of ein and θ so we solve for current in the first equation and substitute into the second one:

To get the transfer function we take the Laplace transform with inital conditions set to zero and solve for the ration of output to input.
A permanent magnet DC generator is physically the same device as a motor, but in this case we drive the shaft of the motor and use the back emf to generate a voltage and/or current. The motor takes as input a mechanical source and generates an electrical output. This is the mechanism used by hybrid electric vehicles to take mechanical energy (from braking) and coverting it to electrical energy (to charge batteries).
Derive the transfer function of a permanent magnet DC generator if the input is τin and the output is the current, i. The rotor in this case is frictionless.
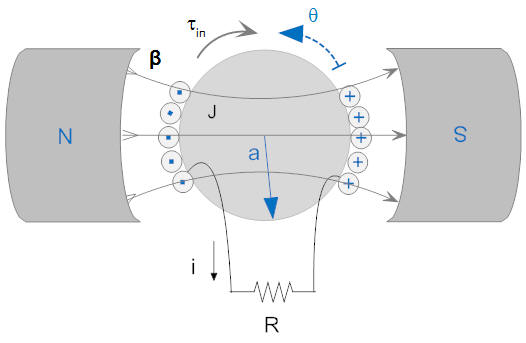
Note: For this problem I purposely chose current and direction to be in directions that seem to defy intution, but if you follow through with the math everything works out properly.
Solution:
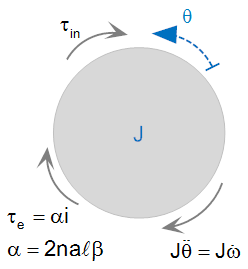
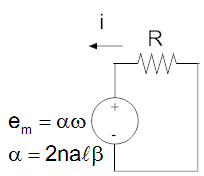
We must first draw a free body diagram and schematic. For the free body diagram we must find the direction of the induced torque. Since a positive current is coming out of the screen on the left side of the rotor and the field is to the right, the induced force is up, so the torque is clockwise. Likewise for the back emf, since the positive direction is defined to be positive in the counterclockwise direction wires on the left side have positive velocity downward, so the right hand rule tells us that the side of the wire closest to us (the left side of the resistor) is positive.
| Mechanical Free Body Diagram | Electrical Schematic | |
 |
 |
|
 |
 |
We want to solve for the ratio of I(s) to Τ(s). Let us take the Laplace Transform of both equations and then eliminate the angular velocity, Ω(s).
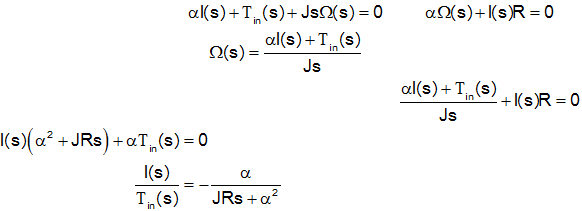
The negative sign in the transfer function merely indicates that a positive torque results in a current in the negative direction (this is because of the chosen direction of current in the first step - if we had chosen the opposite direction, the negative sign would not be present).
Another commonly used electromechanical device is the loudspeaker. A voltage is typically applied across the terminals of the loudspeaker and the "cone" moves in and out causing pressure waves perceived as sound. A cutaway image of a loudspeaker is shown below.

(from
http://www.school-for-champions.com/science/electromagnetic_devices.htmf)
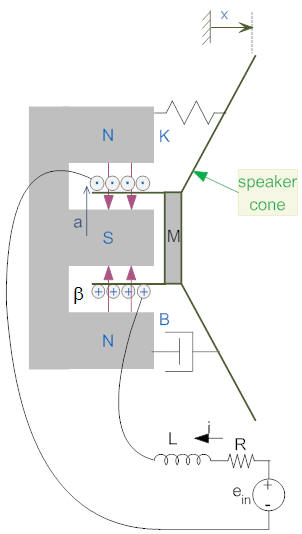
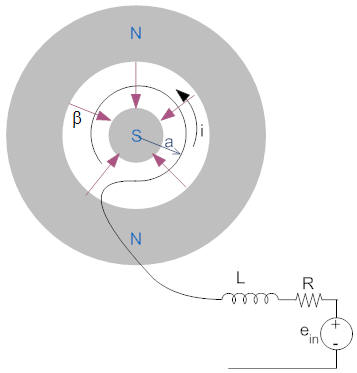
To understand the operation of a speaker consider the diagram on the left below showing the side view of a speaker (and compare with the cutaway view above).
| Side View | Front View (partial view of circuit and magnet) |
 |
 |
As a current passes through the coil, a force is generated that moves the cone. As the cone moves, a back emf is generated in the coil.
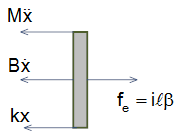
Draw the free body diagram representing the speaker (including the induced force), as well as a schematic (with induced voltage).
Solution:
In order to draw a free body diagram and schematic we need to determine the direction of the induced force and the polarity of the induced voltage (or back emf).
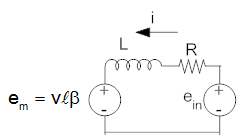
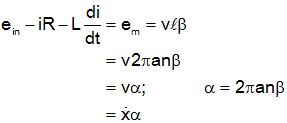
Using the right hand rule we see that the direction of the induced force is to the right (on the top of the coil the current is out of the screen and the magnetic field is downwards; these are both reversed on the bottom of the coil). To find the polarity of the back emf consider the drawing on the left that shows a front view of the system (with the cone removeed) with a partial schematic including part of a single coil. Since the velocity (v) is positive coming out of the screen and the maghetic field (β) is towards the center of the coil, the right hand rule tells us that the polarity of the induced voltage is such that the positive end is on the part of the coil near the inductor.
The total length of wire in the field is given by ℓ. It is equal to the circumference of the coil (2·π·a) times the number of turns (n). That is, ℓ=2·π·a·n).
| Mechanical Free Body Diagram | Electrical Schematic | |
 |
 |
|
 |
 |
Derive the transfer function of the speaker if the input is ein(t) and the output is x(t). When finished, repeat if the inductance is negligible, which it often is.
Solution:
To write the transfer function we need to eliminate current (i) from the two equations. Start by taking the Laplace Transform of both equations.

Solve for current in the free body equation

and substitute into the electrical equation, and solve

This yields the transfer function

Note: this is a third order system, as expected, because there are three energy storage elements (inductor, mass, spring)
If the inductance is negligibly small, we get a second order system

Not yet complete.
© Copyright 2005 to 2019 Erik Cheever This page may be freely used for educational purposes.
Erik Cheever Department of Engineering Swarthmore College